Yet more things that I think are extremely helpful to an artist starting out in the business of illustration. None of these are in order of importance!
4. Structure your day
I am naturally a bit of a night owl (and very much a ‘go with the flow’ kind of person) and when left to my own devices I will go to bed very late and then rise late the next day. When I lived on my own I got stuck in this habit and my days were never the same, there was no structure and I often missed out on most of the day from rising late and actually did less productive work because of this. When I moved in with Matt (for those of you who don’t know, also an artist and very business minded which has been a great help to me! You can see his work here www.mattdixon.co.uk) I had to get used to ‘normal’ days. My day is now a ‘9 to 6’ working day and meals are pretty much the same time every day (lunch always at 12pm or near enough and dinner at 6pm-ish). This structure has helped me no end with getting more work done. When you know that you can stop at the end of the day then that’s better than just diving in and not having any set plan of when your breaks are. SOMETIMES (especially around build ups to deadlines or Kickstarters) I will work after the evening meal, but I will rarely work past 10pm and make sure to have a wind down for at least 30 mins before bed.
5. Brand yourself well
Whether you like it or not your artwork is your ‘brand’. I was not keen on the idea but now that I’ve embraced it and seen how well it can work once one gets the hang of it, it makes it a lot easier. When you have a strong idea of what your creations say (funny, romantic, silly, terrifying etc) then it is easier to stay ‘on brand’ when you post to social media etc. Who does your art appeal to? What genre are you part of, or have you created a new genre!?
6. Work hard
This might seem obvious but when starting out I don’t think I appreciated how much I had to put in to see any return on my effort. The more structured my workdays became and the more I ran with my brand, the harder I worked at it as I was beginning to see results.
The social media side of business is a HUGE part of getting seen these days (certainly for what I do with creating my own books and running a Patreon page) and it will seem like too much time has to be spent on social media than you want, and it will be like that to begin with. As your following grows however it does become slightly less frantic! Study what other artists in similar genres to you are doing to get seen, what is working and what isn’t. It’s a constant evolution and while it is very time-consuming and can be exhausting, it can also be hugely satisfying.
7. Take time off
VERY VERY important. When I say work hard I don’t mean never take a break or have a holiday. You will burn out if you never stop and you will lose momentum and your mojo will dry up. Those days when you go to make art and everything goes badly, you hate every brushstroke or mark are the days that are telling you to get out there and stop for a bit.
Go off and do completely non art related things, or take yourself off for a trip to an art gallery or museum, brilliant places to find ideas. Go on a holiday, go for a walk, look at nature (watch nature programs, they are SO great for creature inspiration if that is your thing!), have a hobby that is not art (my hobby in recent years is growing fruit and veg and it is SO great to switch the brain off, I am also a big fan of cooking and sewing my own clothes).
8. Be patient. Be tenacious.
Starting a business takes a lot of time. As an example, I started my foray into illustration in 2004 and I didn’t start to make a living from it exclusively until 2017! There are no guarantees that I will continue to make a living from it, but I hope that it will continue.
You need to LOVE it, even better if you are a little obsessed with it, this will really help because at the end of the day this is a vocation and the income is a lovely bonus. Nobody who wants to be an artist does so because they want to be rich!
Also remember not everyone is suited to being freelance either, some people will work better within a team or a company. Not everyone wants to run their own business as it is literally 24/7 and you have to do every aspect of it, taxes, accounting, shipping, printing, packing, promotion, management, sales…. I used to want to be a creature designer for movies but after a small trial job in that industry it completely changed my direction and now here I am, making my own things! It is also ok not to make art into a business and just have it as a hobby and not have all the stress of trying to sell art. (If it IS your hobby though and you find yourself selling your art, please please do NOT undersell your time or skills because this negatively affects those of us who rely on our art as a business).
We live in an amazing time with the internet where we can plug in direct to our customers/followers and completely cut out the middle man. Go out there and share your amazing creations with wild abandon!
Something that I am very passionate about is trying to have less negative impact on the planet. My little changes aren’t going to make any big waves, but If there is one thing that will help (if we all did it) is to try to avoid the dreaded SINGLE USE PLASTIC!
I thought that I would go into how I have changed my materials to remove these pesky plastics. Settle back and prepare for one of the most exciting blog posts you’ll ever read…
Recycled Envelopes
Sometimes it is a near impossible task to avoid the single use packaging but I have managed to almost completely remove it from all my packaging and shipping items. The one thing which still has single use is the heavy recycled card envelopes that I use which have one of those plastic rip strips. I have not yet found an equivalent envelope without it to replace it but I’m hoping they will appear once demand is greater. I notice Amazon have rip strips without plastic now so it isn’t impossible. For those of you UK based, ‘Best Buy Envelopes’ are where I source my rigid recycled mailers.
‘Jiffy Bag’ Mailer replacements & Small boxes
I have now got through all my old jiffy bags (with bubble wrap in them) and am now replacing those with ‘Enviroflute’ mailers (all paper but behave like a jiffy) and use these or small cardboard boxes for sending enamel pins and similar.
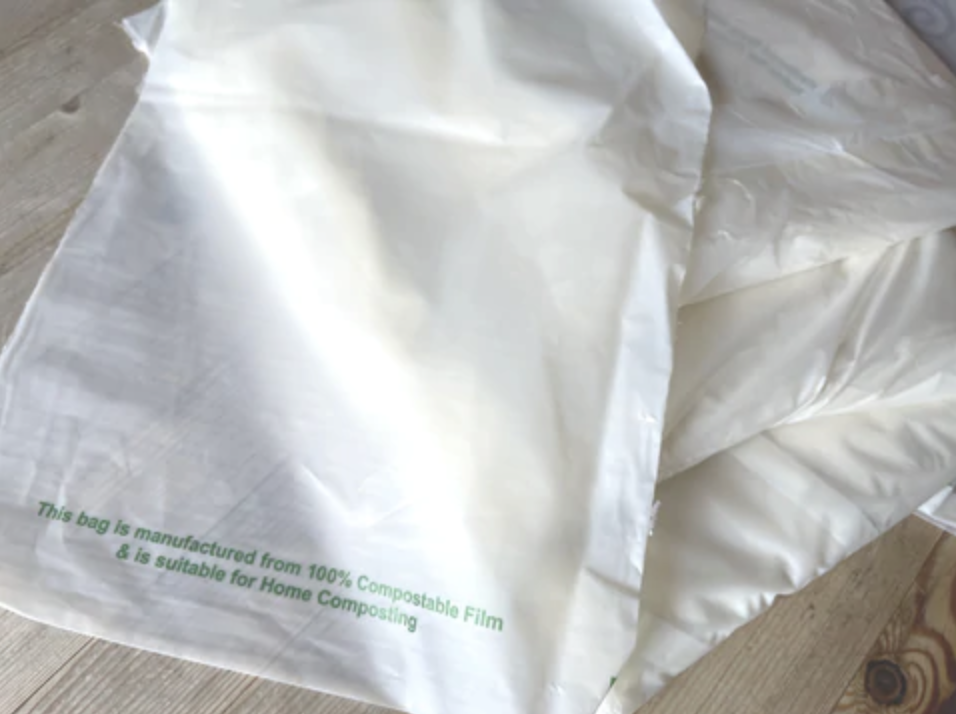
GLASSINE – Cellophane bag replacements
Be sure when you are looking for cellophane replacements to look for ‘compostable’ and not ‘biodegradable’. The latter means it still has to be degraded in a very specific way (usually needing high temperatures) so will not always be degradable if it is not processed in the right way. The word you want is ‘compostable’ which means that you could put it in the compost heap and it will rot away with no damage to the environment… YAY! There are loads of options for clear compostable envelopes now which is fantastic. Also another thing to note with compostable bags is that they have a shelf life too.
I do not need my bags to be clear though since I do not show my work at fairs or shows so I have replaced all my cellophane bags with Glassine envelopes. These are what you would find stamp collectors using as they are acid free and archival and recyclable (and compostable since they are paper based). I ship my prints and originals in these and if the original is too big I have either tissue paper or sheets of glassine to wrap them in. This is not waterproof (only ‘resistant’) however but in the case of an original, it is going to be wrapped in several layers of protection (including bubble wrap that I reuse from items sent to me) and with prints which are not so well wrapped, if they are destroyed I am happy to eat the cost of a replacement print for the sake of the planet. So far I have not had any issues with damaged items in these envelopes.
Starch/Compostable Bags
UPDATE! Since writing this blog I have run out of glassine envelopes and found it extremely hard to get replacements which is very frustrating. It’s easier to find smaller bags in glassine but not the big ones I was using for my A4 sized prints and books. I have since found some starch bags which are compostable which are water and oil resistant. I found these on eBay, but you will be able to find many places that sell starch bags. Make sure they say ‘home compostable’ on them and not ‘biodegradable’ too!
Paper Stickers VS Vinyl/Plastic Stickers
I think that arguably a vinyl sticker is not ‘single use’ since it is a piece of art that will last a considerable amount of time stuck to the object of your choice. For me though I don’t like the idea of it so I have chosen to only produce paper stickers which are happily much easier to come by these days! I get my sheets of paper stickers (for keeping my glassine envelopes closed) from Stickythings.co.uk which is a really great company and I highly recommend them. There are a few companies if you do some googling which will produce individually cut paper stickers rather than just the vinyl ones.
Avoiding ‘lamination’
Aside from book covers which might need that extra bit of protection, I am choosing uncoated paper which has not had a plastic laminate finish. This means all prints/cards etc from me will be recyclable and not have a plastic finish. (It also suits the watercolours rather well!)
Kitchen towel for painting
I normally go through quite a lot of kitchen towel to absorb excess water and paint when I’m working. I keep this under where my brushes lie and I have now replaced this with a washable reusable microfibre cloth. I foolishly hadn’t realised that microfibre is in fact also a plastic. So please do avoid this!! Now that I have these I feel it is my duty to use them till they are spent but I am frustrated that I wasn’t aware of their nasty properties! A cotton towel would have been far better. Even better use some old t-shirts for this purpose. (I generally avoid synthetic materials with clothing for this reason and not sure why I left my brain behind when it came to this choice of kitchen towel replacement!)
I still use kitchen towel but a lot less and just for mopping up spills and splashes on my paper when I’m painting.
Aside from my microfibre boob, I think that my whole eco-friendliness is pretty good, after all it is a work in progress and I am sure I will add more to this blog as time goes by.
For those of you trying to avoid single use plastic, I hope that this article has been helpful for you. If you have any suggestions or recommendations for other eco-friendly products then please do comment below the article.
I’m always on the search for the ultimate pigment or brush, it is a bit of an obsession and I’m pretty sure any artist will have a stash of various mediums that they have tucked away to try out.
Here I am going to go through everything I use for painting and I’m sure I might add to this at a later date but I don’t have lots of special gadgets, just some preferences!
I’ve given links to the sites where I can but where I haven’t, you will have to search for the items yourself (I am trying to only link to the brand’s websites, not specific sites I use). I regularly get some art supplies (paint) from Jackson’s Art but also Cass Art occasionally, whoever has the cheaper option (or the pigment I’m looking for as they’re not always available everywhere).
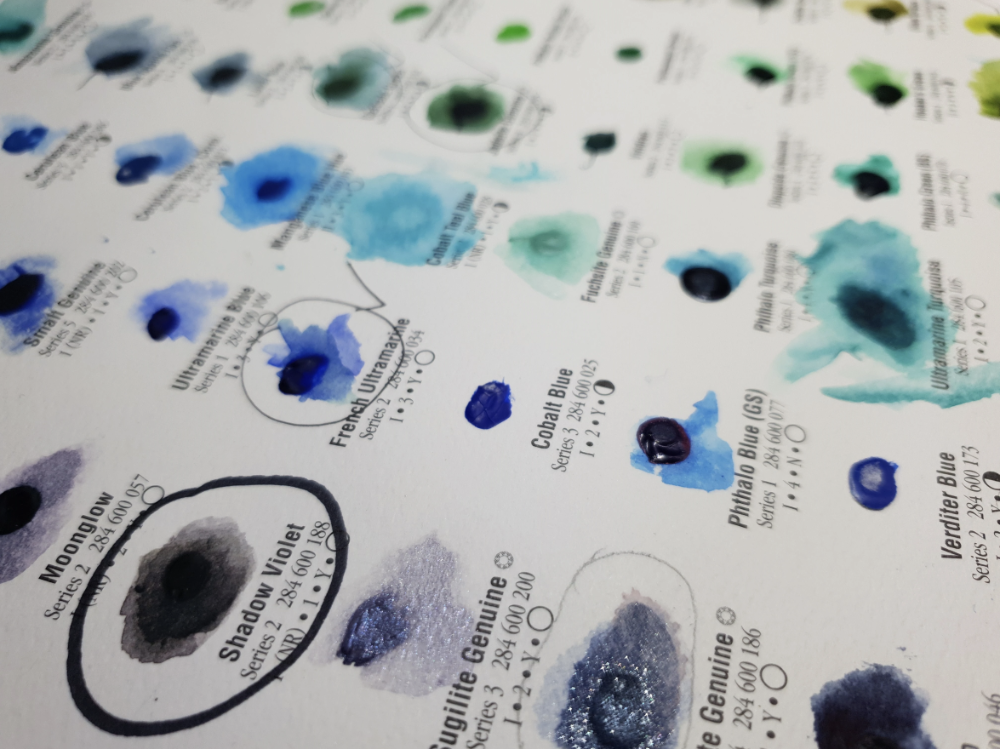
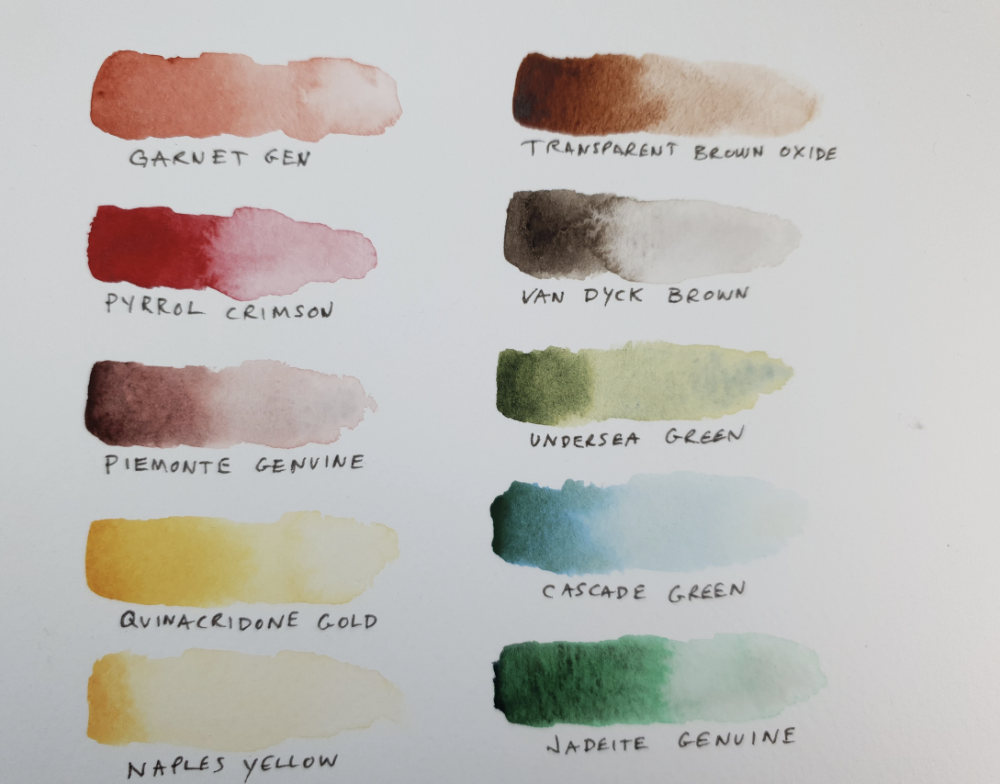
I don’t tend to get stuck on one brand of anything religiously but for my watercolours, they are far and away predominantly made by Daniel Smith. I think that the biggest appeal for me is their selection of pigments which are made from gemstones, some of which actually have a bit of sparkle to them.
Their range of colours is also impressive quite aside from these gemstone pigments and you can buy a ‘dot sheet’ which is a way of testing out each pigment before you commit to buying a whole tube. I don’t know any other company that provides this service.
They are talked about as being very expensive but considering how far the pigment goes I don’t think that they are, plus there are other brands which are considerably more costly than these.
A lot of their paints have a granulating quality to them which some would find irritating but for anyone wanting to create textures is just brilliant!
You can see how some of these dry with a lovely textured finish and others are non granulating (like the Quinacridone gold) which dry with a smoother finish.
Holbein do one of my favourite purples, Mineral Violet. Their pigments are really vivid and their quality is consistent. I own a few different colours in their paint that mix very well with the Daniel Smith.
For little dabs of light in the eyes I usually will use gouache or white ink or an acrylic gouache. I have settled on W&N for the white gouache though as it is really gorgeous and buttery.
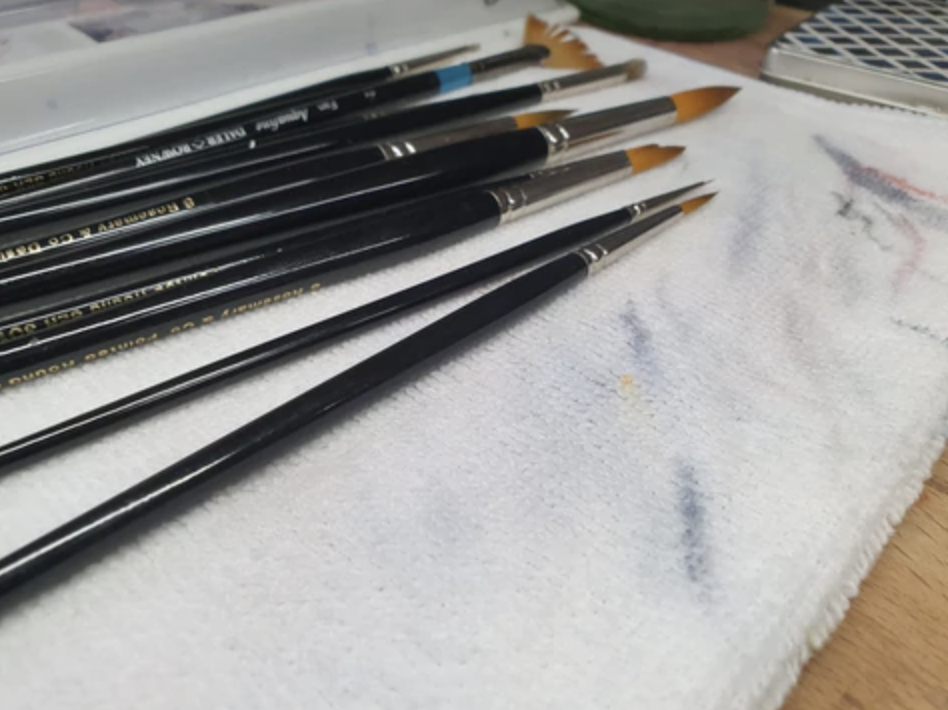
I have settled on using one brand (almost exclusively) now for my brushes and recently converted to synthetics. I had previously been nervous about trying synthetic, being convinced that sable was ‘better’ and yes, it holds the water/pigment slightly differently but I would say both have their advantages and disadvantages. The only animal hair brushes I use now are Rosemary & Co’s badger hair ‘Smooshing‘ brushes which are really really brilliant. The thing I’ve noticed with the synthetics is that they keep their shape a little better than the sable and that they release water a lot more keenly, so I have had to alter my technique slightly to compensate for this.
My absolute FAVOURITE brush from R&C is their Golden Synthetic series 344. Designer Rounds. They’re really amazing for a point and I have been able to make very detailed paintings with their size 8 and it can still be used for larger wash areas too. Their regular Pointed Rounds (301.) are also nice but don’t have that extra length that the Designer variety does. Also their rigger brushes are to die for! As well as all this they are incredibly reasonably priced.
I have a few non branded brushes for other things which I pick up if I find cheaply in art shops, ideal for ‘ruining’ for using masking fluid or other things which shorten the life of a brush pretty fast.
Paper
I am very lazy when it comes to stretching watercolour paper, so I avoid this by almost exclusively using illustration board. The big downside for this is a) it’s more expensive and b) takes up more space when storing and c) more expensive to ship!
For non important watercolour endeavours I tend to go for Bockingford Watercolour paper in hot press, having used board for so long now I dislike working with paper this thin (300gsm!) as the pigment behaves differently. This could just be the brand too as they do all behave slightly differently (best thing is to try lots of them out to see which you like best!).
Strathmore 500 Illustration board – this is my FAVOURITE board but it is very expensive and I have not been able to get any for a couple of years now. Such a shame! So I now use Langton Prestige Watercolour Board. You can’t use both sides of it like Strathmore but I still love it. The hot press is my favourite but their cold press is still pretty smooth as cold press goes.
Gloves
When I’ve done live streams of me painting, people often notice I’ve got some white gloves on and ask me why. These stop me from getting my fingerprints on my paper or board so I now make a habit of wearing them when I paint all the time. I buy cheap packs of cotton archival gloves and then cut the first two fingers and thumb off my painting hand to use them. They can be washed and reused as well.
I’ve seen that other artists don’t wear gloves so it might just be that I am extra greasy (!) but if I don’t, then I end up with odd bald patches where the paint doesn’t adhere to the paper so well, so if you have discovered this then here is the answer to your problem!
Palette
I have been using ceramic palettes now for a while and they are my preferred choice for mixing paints as they don’t stain and they’re easy to clean. They’re a little heavy but there is quite a good variety of choices out there now if you search for ceramic palette.
These are all my most regularly used tools, I hope that it has been helpful or interesting! If you have any requests for blog subjects then do not hesitate to drop an email my way or comment under this blog.
This post is going to refer purely to my inspiration sources for creatures, I will be making a separate blog post/s on artists that inspire me and that have inspired me over the years. This one is to show how I accumulate different ideas for my beasties.
Ever since I was very little I have absolutely loved nature documentaries. I grew up in the country and we had cats and dogs and later on horses. I love animals and the more I adventure deeper into Strangehollow, the more I realise that this imagined world is very much grounded in nature than it is in a fantasy world. While my art isn’t realistic, I want to be able to give that feeling of something that could exist in our world. And like with the natural world around us, some of these creatures might look beautiful or even cute to us, but could hide deadly poisons in their skin or have insatiable carnivorous appetites! Recently someone on instagram said to me that my creatures felt like they might look cute sometimes but that they were wild animals and I loved that comparison!
I have a tendency to be attracted to the same shapes over and over again (as can happen, getting too comfortable!), so a good way to try to snap out of that, I find, is to have a good old explore on Pinterest for wildlife photos (as well as rewatching some of my favourite Attenborough documentaries. I’ve discovered some creatures on there that I never even knew existed and it’s just an endless stream of visual seeds to grow into new creatures and beings for Strangehollow. I will spend a bit of time sketching animals I like the look of in the hopes that they will get lodged into the library of shapes in my brain and then appear in paint in the form of a new being.
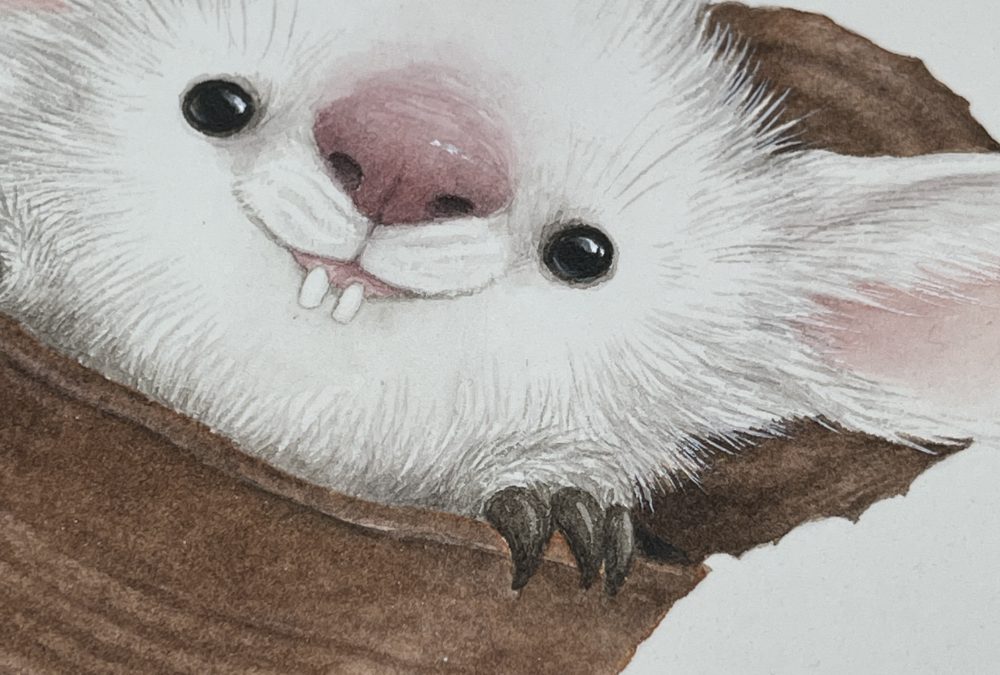
‘The Call’, the painting at the top of this blog, has been an idea germinating in my mind for a few years now. I loved the idea of a unicorn calling for a mate and had seen all these beautiful wildlife images of Stags in rutting season, steamy breath coming from their mouths as they roar from the sides of mountains. One of my patrons said that she thought this would sound like an Elk ‘bugle’, something I had never heard of (the bugle, I had heard of Elk!), and wow, it is not the sound I would expect from a beast that looked so very similar to a Red Stag.
Here is a small clip I found on YouTube:
It’s so musical! I imagine my unicorn to sound like a mixture of this with a dash of horse whinny in there too.
The inspiration for my unicorn was mostly from red stag images and a little equine influence as well. I didn’t want that U shaped neck like you get with deer so I toned that down a lot. Here is my ref sheet that I had on hand when I was sketching the image:
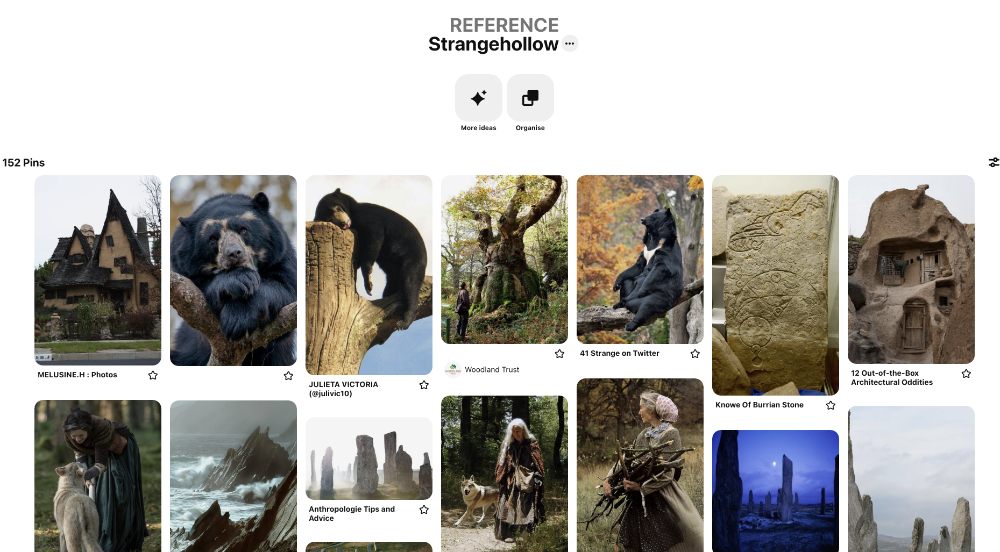
I am sure most of you are familiar with Pinterest as a platform, but if not, it does this wonderful thing where if you have collected a few pictures on a board, like I have here with inspiration for Strangehollow:
Then when you scroll to the bottom of this board, Pinterest will suggest other things which are similar to those that I’ve selected that I might not have seen. I then go down this glorious rabbit hole of new creatures! Some I might save for their markings, others for how they are shown in a tree, and others for their strange physical features that I can then borrow and use to frankenstein my own new creature out of them! The same happens with anything I search, for instance colour and texture is one of my favourite boards I have created and I keep this at hand for the skin of dragons or other beasts!
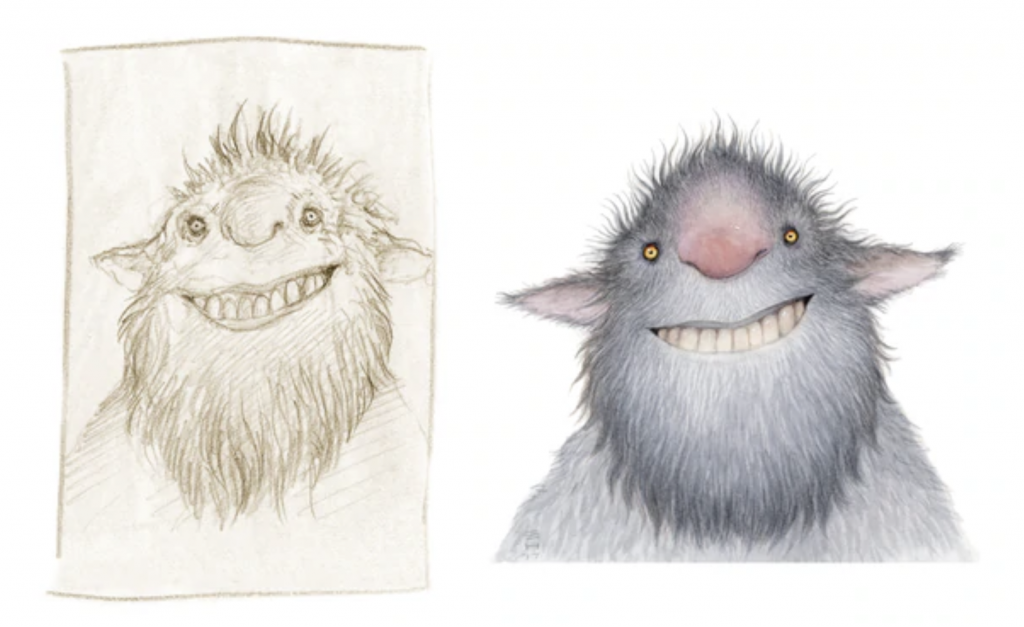
Aside from visual inspiration one of the most powerful idea-generating things for me is the written word. It can be a silly made up name for a creature, like ‘Darkling Glib’ that Kat Cardy (colourful animal artist and patron of mine) so brilliantly suggested (along with some other fantastic name ideas which will be appearing in the new book) and it IMMEDIATELY gave me a visual in my head. This then became a sketch. And then from this sketch I created the painting freehand (although I now wish I had transferred the sketch as some of it’s sinister quality was lost in the painting.
More often than not I will be inspired by a phrase or paragraph or name more than I will something visual. I will be making another post about this as I think it is a really fun subject!
Everything I look at and watch will seep into my mind-bank of images and shapes and continue to influence the creatures I make, I can’t wait to see what new critters appear over the next few months!
As some of you will already be aware, I am no longer using Patreon to run my membership. I have now moved to my own membership site called ‘Mysterious Corner’.
I thought, since I have already had quite a few people asking, that I would make a blog post about the why’s and then follow that up with HOW I did it in another blog post.
What IS Patreon?
I realise that some reading this might not even be aware of it, or know what it is. It is a platform that was created to allow artists, musicians, cosplayers, vloggers, podcasters etc… any creatives, a means for their fans to support their work. For me I used it as a subscription for those who love what I do, to come and see a little behind the scenes in my studio. Patreon was launched in 2013 but I didn’t try it until 2015 (unsuccessfully) and then started again properly in February 2016.
In exchange for using their site, they take a percentage of what each creator makes. Creators are able to offer different tiers and options to their fans. It is an amazing platform and has become a familiar name which is very useful if people are a bit windy about joining a membership, if they recognise a name, they feel more comfortable with using it.
It was started by musician Jack Conte and has now become a billion dollar business.
If it’s so great, why did you leave?
Patreon has made it possible for me (and very importantly my patrons have made it possible for me through Patreon) to become more and more independent as an artist to the point where now, I am able to pick and choose any client work or not take any at all. I exist through running my website, selling prints and originals and making books via Kickstarter and up till recently through my Patreon membership. I will always be grateful for the existence of Patreon but in the last 18 months/2 years it has been increasingly frustrating to use, not just as a creator, but as a patron of other creators.
Creators have been asking Patreon via their creator support forums for various things for the whole five years I have been using it. These requests are often very basic things that one would think would have been priority – for example; a great messaging system, a comprehensive discovery page, a better way to let patrons search through old work (it is still infinite scroll), a search so that patrons can search through all posts etc. There is a very long list! Almost every request of this kind over the past few years has been met with ‘thank you we heard your request and we will share this with our team’ – and then it’s been crickets.
Their customer service was SO GOOD when they started. I could send a message asking for help and I’d have a reply from a human being within 24hrs. I am not able to do that now. It is a huge behemoth and that is great for the company, but not for me!
Some reasons why I decided to leave:
Difficult user experience as a creator
Hard to navigate for patrons
Difficult to use messaging system
No control over how my page looks (they kept changing the landing page)
No control over how my patrons are taxed (since Patreon is USA based)
Changes made that don’t seem to help while ignoring requests for changes that would from creators
No way to easily look through old posts for patrons still, just infinite scroll
Percentage of my income goes to Patreon
Terrible customer service
So SLOW and buggy
I think I can stop there, you get the idea.
I have left so that I can have total control over my membership and how it looks and while there are things I won’t be able to do with mine (no mobile app, fiddly back-end stuff for me to do as the owner of it amongst other things), I thought it was now or never! While many of my patrons won’t be following me to my new membership, I am glad that I have made the change, it is really great not having to deal with a third party in order to run the membership side of my business.
Should you avoid Patreon?
Short answer, no. Patreon, if you treat it like a simple tip jar isn’t a bad option and there are many creators who are using it to great success and making a huge income there. I just wanted to do my own thing. However I would say that you need to look into the MANY options out there now who are starting to compete with them. There isn’t anything out there that is exactly the same as Patreon but there are many that are very close. Patreon makes things easier in some ways (especially if you’re starting out or you don’t want to deal with building your own website) as they deal with all the backend stuff for you, so keep these things in mind if you are thinking of doing what I’ve done.
I will be making another post about how I built my new membership soon.
Moving to this new website has been stressful and has been very time consuming (but hopefully won’t continue to be!) because of set up and re-learning a new platform (WordPress) but I am very excited to see how I can grow my membership under my own steam. Watch this space!
In this blog I’m just going to give a rundown of my desk where I work and what various gadgets I use that help me do what I do. The studio is very small and I share it with Matt and any time there is bright natural light flooding in, it has to be shut out because that doesn’t work with Matt’s digital art… hence all my lights!
I have recently invested in a camera so that I can make more videos (EXCITING! – here is the last one I made) rather than using my phone, which runs out of battery too fast for it to be practical and just doesn’t give me as crisp an image as I want. I tried a gadget called the IPEVO 4K which was a desktop webcam type device but all my videos just turned out far too gloomy.
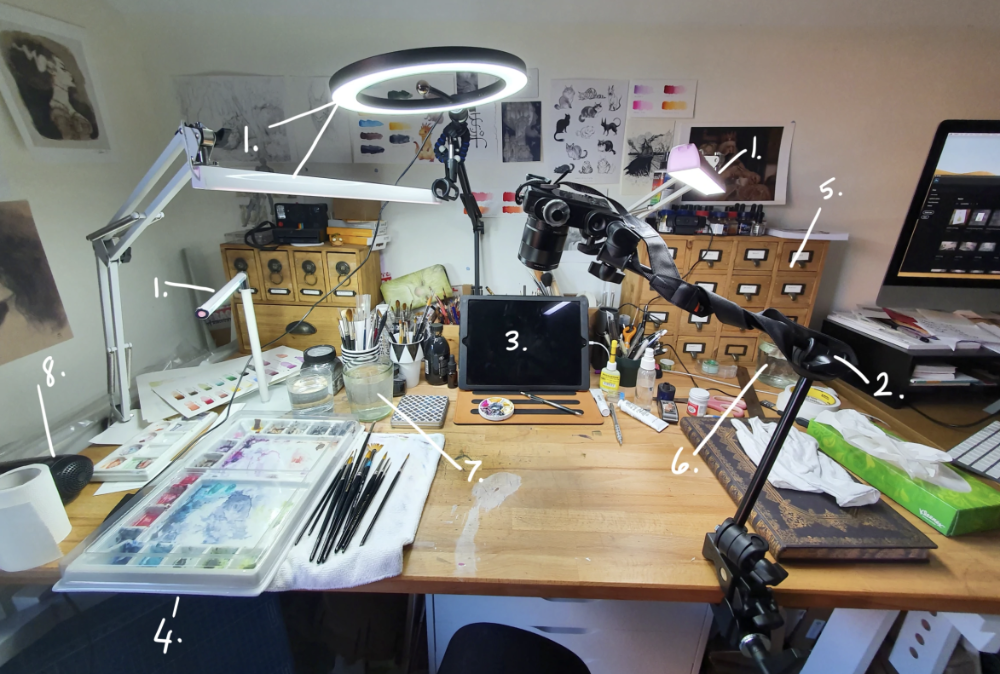
I have photographed my desk and will break down all the bits and bobs that may be of interest. This is my desk as it is normally and the right hand side is where there are usually lots of pencils/paper and bits that don’t usually get tidied away.
Here I have marked out each object and I will give you links where I can to where I purchased each item:
There are lots of 1’s! These are all lights that I have collected over the past two years. There are two Youkoyi LED Lamps which clamp to the desk and you can move them about easily to point where you want. There is a little standing LED lamp that lights my ceramic palette too. Then finally a newer addition which is the ‘ring light‘ (also known as a beauty light) that is above the desk. I have attached it to a microphone arm that I had been using to hold my phone for painting videos. It is always worth looking around outside of Amazon for better deals on these things!
Is my newest addition which is the Manfrotto Single Arm 2 Section with Camera Bracket + Super Clamp. It is VERY sturdy (metal parts) and really good value (£60.90 as of today). It is holding my new Sony A6400 camera very easily, be sure to look at the max weight limit on this arm, I don’t know how big or sturdy a camera it would hold as some of the reviews mention it wouldn’t hold their camera’s weight. Manfrotto also do a slightly more expensive arm which could be better if you have a heavier camera. Look up ‘Manfrotto variable friction arm’ and you will find a selection. Big thanks to the wonderful Will Chidlow for the suggestion of the arm, go check out his youtube as it is very good! He is a great friend and is the filmmaker of my current Patreon video.
Good old iPad Pro. I use this mainly for reference when painting and sometimes to play crappy tv in the background while I work!
Ceramic palette. I prefer ceramic palettes as they don’t stain like plastic ones do. This one is a bit of a beast and definitely not for travel! Works great for me though for home. Just search on eBay or Amazon for ceramic palette and you’ll find a few! Jackson’s Art Supplies are also a great resource as well as Cass Art. I get my paints mostly from those two.
Mini chest of drawers (the left side of the desk has another chest which I also found in the same shop). I found this on Wayfair but you can find these kinds of drawers all over the place and often second hand. I use this to store all my watercolour tubes and label each drawer with the appropriate colours ‘blues’, ‘greens’, ‘yellows’, etc.
Drinking water! I am very careful to put my drinking glass FAR away from my paint water. I have never as yet accidentally had a drink from my paint water and I am confident this is because of my careful placement!
Two glasses of water for paint, one to get fresh water on the brush, the other for cleaning the brush. FAR AWAY from my drinking water area!
Mini travel hairdryer – this is always plugged in and ready to go when I need to speed up the drying time of a painting. Only cost about a fiver and has been around for years!
So, that is it! If you have any questions, don’t hesitate to pop them in the comments below!
 2
2